

An ambulance roof leak may drip far from where water enters. Effective ambulance high roof leak prevention in desert rainstorms starts by tracing the water to its source, such as a worn membrane, separated seam, roof edge or penetration, before choosing a repair.
Heavy rain and wind can expose weak points that go unnoticed in lighter weather. A stain or damp patch is a clue, not proof that the roof directly above has failed. Covering the visible mark without tracing the entry path can leave the underlying problem unresolved.
This guide explains how to spot membrane wear and failed roof details, trace water from its entry point and understand what a professional inspection checks. It also covers why drainage, joints and roof penetrations matter when choosing waterproofing for an ambulance high roof. The aim is a repair that addresses the actual failure, not a temporary cover-up.
Key Takeaways
- Cracks, aging membranes and standing water can point to weaknesses that heavy rain may expose.
- A ceiling stain may come from an AC line or window perimeter, not the roof directly above it.
- Pay close attention to seams, flashing, parapets and roof penetrations, where water can find a path inside.
- Professional source tracing helps connect visible dampness to the actual entry point before waterproofing is selected.
- For ambulance roof conversion needs, Auto Industries Factory’s ambulance conversion work is a relevant next step.
Cracked waterproofing layers and aged membranes
Cracks and worn membranes create openings where wind-driven rain can enter an ambulance high roof. Before repairs begin, an inspection should distinguish surface wear from a failed seam or drainage problem.
Cracks in Aging Waterproofing
An aging waterproofing layer can lose continuity as cracks, lifted edges or brittle areas develop. Even a narrow opening in an ambulance roof can let water pass beneath the membrane and travel before appearing inside. The visible drip is therefore an unreliable guide to the entry point. Inspect the roof surface, seams and edges, then trace the likely route before choosing a repair.
Standing water puts added pressure on weak areas. Flat roofs need a fall towards drains; otherwise, water can pond around seams and stress the waterproofing. Blocked drains can worsen the problem during heavy rain. A professional inspection should assess water flow, membrane condition and the connection between each drain and the surrounding waterproof layer.
UAE heat and cooler nights cause materials to expand and contract. This movement can widen existing cracks and strain bonded roof edges. UV exposure also affects temporary fixes: roof-repair tarps can degrade within weeks. An emergency cover may limit immediate exposure, but it does not replace finding the failed layer and making a durable repair.
Sealants for Seams and Extreme Conditions
Liquid Rubber Waterproof Sealant is one sealant option, but its suitability depends on the roof substrate, seam movement and exposure conditions. Professionals assess adhesion, flexibility, temperature range, UV resistance and compatibility with existing layers. These properties matter because a rigid or poorly bonded seal can separate as the roof moves or holds standing water.
For ambulance roof seams exposed to UAE heat, professionals match sealant properties to the surface material, joint movement, UV exposure and expected water contact. They prepare the seam and confirm compatibility with the existing membrane before application. Choose Liquid Rubber Waterproof Sealant only when its product data supports these conditions, not by name alone.
For ambulance modifications in the UAE or Gulf, applicable vehicle approval requirements depend on the jurisdiction and vehicle. Waterproofing repairs and sealant selection do not, by themselves, establish approval for a roof modification. An inspection should distinguish the water-sealing work from any approval requirements for structural or body changes.
Choose a repair based on the cause. A crack across a membrane, a separated seam and water held by poor drainage require different corrective work. Sealing a wet or moving joint can hide the symptom while leaving the entry path active. A source-led inspection helps determine whether the remedy needs seam treatment, membrane replacement, drainage correction or a combination.
Expert waterproofing for roof leaks during heavy rain
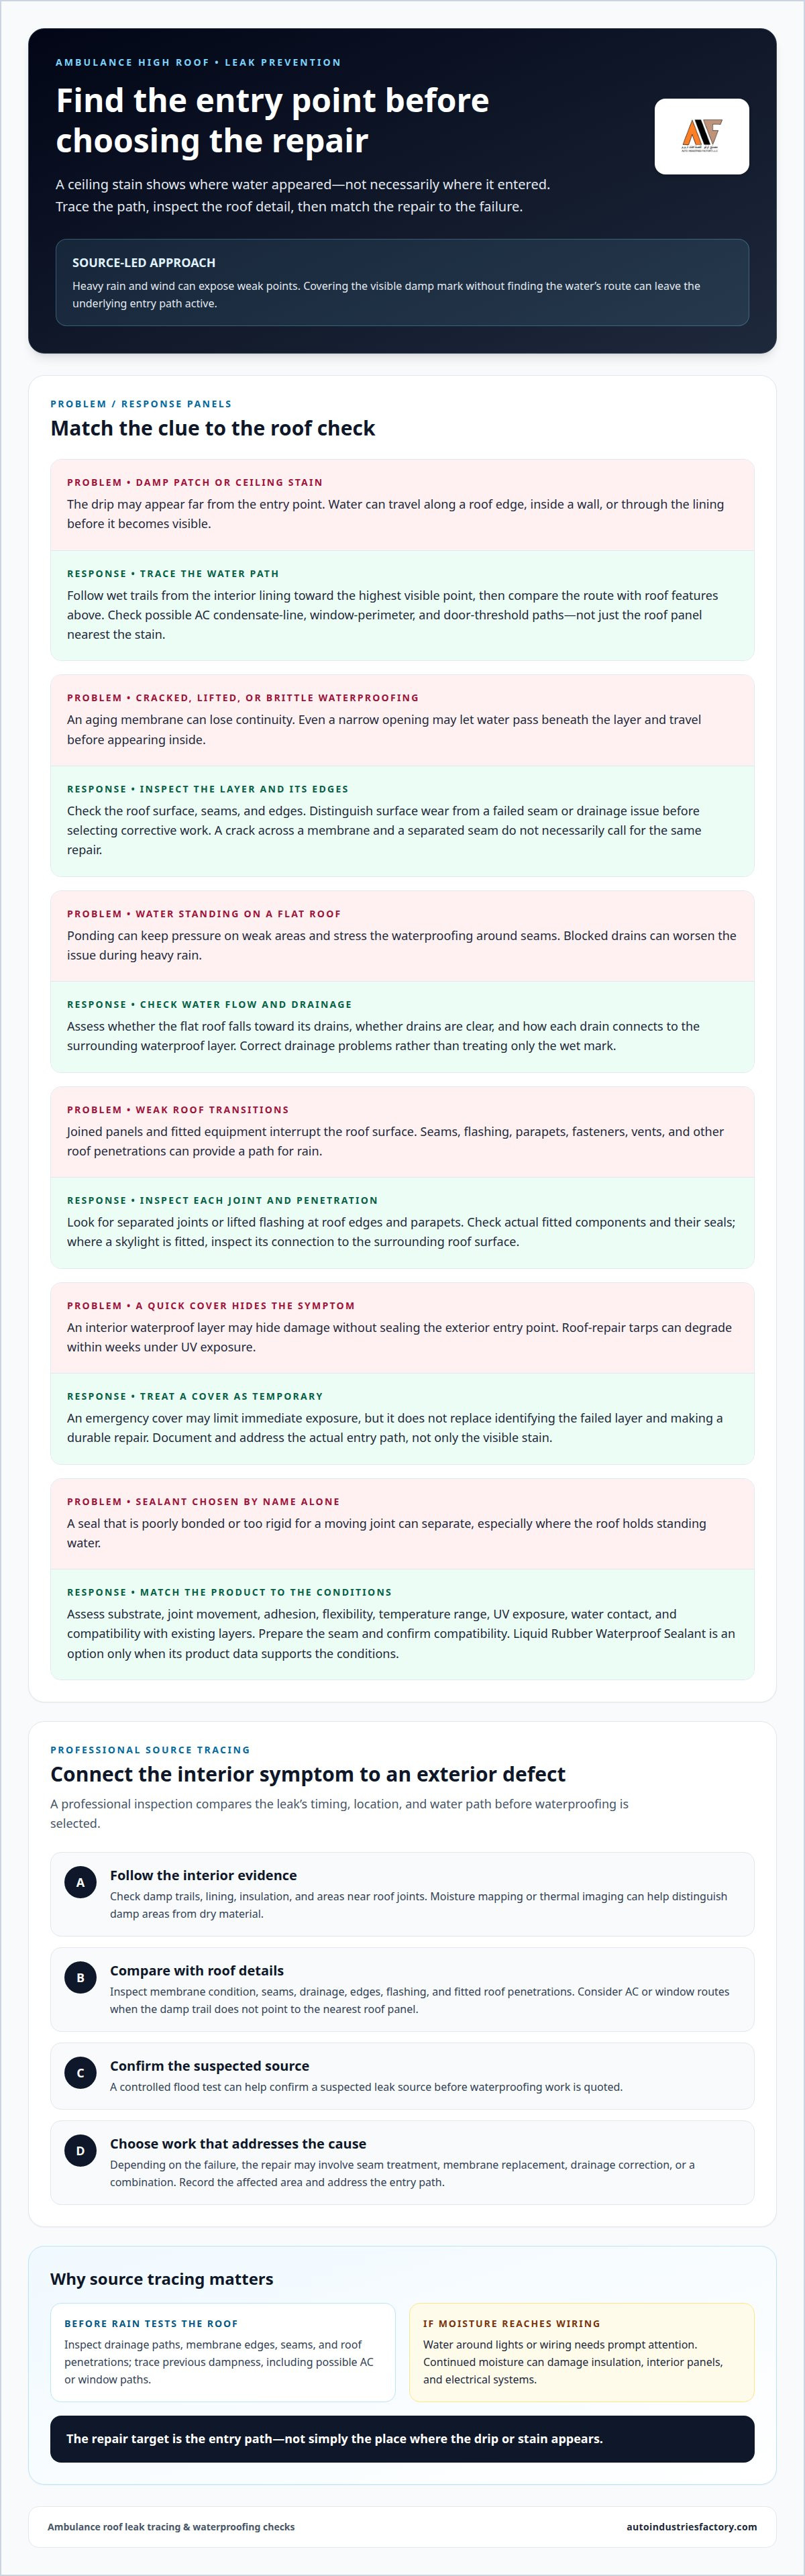
Water inside an ambulance does not automatically mean the roof has failed. Before choosing a roof repair, a professional compares the leak’s timing, location and water path. An AC condensate line, window perimeter or roof membrane can leave similar damp marks. Treating the wrong source leaves the actual entry point exposed to the next storm.
Professionals trace wet trails from the interior lining towards the highest visible point, then compare the route with roof features above. A damp patch beside a window may come from water travelling inside a wall or along a roof edge. A ceiling stain may also relate to an AC condensate line or a door threshold, rather than the nearest roof panel. The stain shows where water appeared, not necessarily where it entered.
Roof waterproofing works only when the repair suits the failure. A professional checks the membrane, seams, drainage and transitions before choosing a compatible repair method. On a flat roof, standing water can keep pressure on a weak seam. Separated membrane joints or flashing around roof edges and parapets can also admit rain. Applying a waterproof layer inside the vehicle may hide damage, but it won’t seal the exterior entry point.
Where fitted, skylight frames need a sound connection to the surrounding roof surface. A failed seal at that junction can let water into the interior. Lifted or separated flashing can also admit rain around other roof penetrations. On an ambulance, an inspection focuses on the actual penetrations and fitted equipment rather than assuming a particular feature is present.
Inside the vehicle, a technician follows damp trails, checks the lining and insulation, and looks for water near roof joints. Moisture mapping or thermal imaging can help distinguish damp areas from dry material. A controlled flood test can help confirm a suspected leak source before waterproofing work is quoted. The aim is to connect the interior symptom to a specific exterior defect.
Ignored roof leaks can damage insulation, interior panels and electrical systems. Continued moisture can weaken materials and lead to more extensive repairs. Water around lights or wiring needs prompt attention. A repair plan should document the affected area and address the entry path, not just the visible stain.
To prepare an ambulance for sudden UAE rainstorms, professionals inspect drainage paths, membrane edges, seams and roof penetrations, then correct defects before rain arrives. They also trace previous dampness to its source, including possible AC or window paths. This preventive inspection can identify weak points before heavy rain tests them.
Failed joints, flashings, parapets, and roof penetrations
Roof joints and equipment mounts interrupt the roof surface, creating vulnerable transitions. For ambulance roof waterproofing, inspect every seam, fastener, vent and fitted component.
Sealing Roof Seams and Equipment Mounts
Sealing roof seams and equipment mounts means protecting the edges where joined panels and installed hardware meet the roof. Professionals inspect vents, light bars and antenna mounts for gaps, loose edges, failed sealant or movement around fasteners. They identify the material and joint condition before choosing a compatible repair. Treating each penetration as a potential entry point helps prevent a temporary patch from masking another leak path.
Maintaining Metal Roof Seams
Metal roof seams are joined panel edges; fasteners secure panels, and flashing closes transitions. Leaks often start around these details rather than through intact panels. Professionals check for separated seams, exposed or loose roofing nails, and flashing that has lifted or corroded. A loose fastener can create a direct entry point. Repair the failed connection rather than simply covering the nearby panel with sealant.
Parapet edges and roof corners also need close attention. A separated membrane or flashing connection can let rain beneath the roof covering and channel water along the structure. This hidden route differs from the simple assumption that a stain marks a leak directly above it: vehicle roofs have their own joints, equipment and drainage details. Before waterproofing begins, map each transition and identify the likely entry point.
Preventing Leaks Around Roof Equipment
Preventing leaks around roof equipment starts with inspecting the equipment base, surrounding seal and nearby fasteners. Around air conditioners and emergency equipment, professionals check for a separated mounting edge, failed sealant or water collecting beside the base. They repair the defective interface and assess nearby penetrations. This focused process protects structural connections without relying on a broad, temporary coating.
For seams, vents, light bars and antenna mounts, professionals inspect each joint, remove failed sealing material where needed, prepare the surface and apply a compatible waterproof seal. The repair must also account for the equipment base and its fasteners: sealing only the visible perimeter may leave another entry path.
Inspecting and Replacing Roof Seals
A roof-seal inspection checks for cracking, lifting, hardening, gaps and water tracks around each penetration. Hot, dusty UAE conditions can leave debris at vents and equipment bases, so include these details in periodic maintenance. No single replacement interval suits every ambulance roof. Seal condition, exposure, joint movement and signs of leaking guide the decision to repair or replace.
Vent-pipe boots and flashing need periodic maintenance because a split boot or lifted edge can admit driving rain. Professionals check that the boot remains seated and the surrounding flashing stays connected. If an interior stain appears after rain, compare its position with roof joints and equipment above, since water can travel before it becomes visible.
How heavy rain exposes weak points in roofs
Heavy rain changes how water interacts with an ambulance roof. Wind can drive rain beneath a covering’s edge, while water collects around seams, fasteners and mounted equipment. A joint that stays dry in a light shower may leak under sustained flow. Rain can therefore act as a stress test, revealing weak connections that ordinary weather may not expose.
On a flat roof, water needs a clear route to the drains. Debris can restrict that route, causing water to pond and remain against joints longer. This added contact exposes small gaps at membrane seams, parapet edges and equipment bases. An inspection should consider both the suspected leak point and the route water takes across the surface.
Wind direction can change the leak pattern. Sideways-driven rain may enter beneath a roof edge or through a vent hood close to the roof. If leaking happens mainly during gusts, wind-driven entry is a useful clue. It does not identify the exact opening, but it helps professionals focus on exposed edges, vents and weather-facing joints.
Heavy water flow also tests fasteners and flashing. A loose fastener can leave a direct opening, while separated flashing can let water pass around an edge instead of through the roof panel. The drip may appear far from the defect. For example, water entering near a roof corner can travel along an interior surface before dripping above a cabinet.
Different leak mechanisms leave different clues. Pooling near a drain points to restricted flow or poor drainage. A drip that appears only in strong wind suggests rain may be pushed beneath a covering. Dampness beside mounted equipment directs attention to its seal and nearby fasteners. Professionals compare these clues with the roof’s condition rather than treating every interior stain alike.
After an emergency leak, limit interior exposure and arrange a source-led inspection once conditions are safe. If water is near lights or sockets, turn off electricity at the mains. A visible stain or temporary cover can help document the affected area, but neither establishes the entry point. The inspection should connect the interior trail to an exterior defect.
Repeated water entry can damage insulation, interior finishes and electrical systems. Wet material may also conceal moisture after the rain stops. Record when the leak occurs, where it appears and whether wind accompanies it. This gives the inspection a practical starting point and helps distinguish a drainage issue from a failed joint or exposed roof penetration, directing repairs towards the actual cause.
Roof leak detection and source tracing
A ceiling stain marks where water appeared, not necessarily where it entered. Before roof leak repair begins, professionals trace the source. For an ambulance, technicians compare interior moisture with roof seams, equipment mounts, drainage points and nearby body joints. This helps distinguish a roof defect from an AC line or window leak, which can leave a similar mark.
Tracing starts with the leak’s timing and location. A technician records whether water appears during heavy rain, gusts or after rainfall ends. They inspect damp trails and follow them towards the highest likely entry point. A stain beneath a roof edge, for example, may connect to a separated seam farther uphill. The path matters more than the stain alone.
Inside the vehicle, technicians examine ceiling panels, insulation and adjoining surfaces for dampness or dripping. A bright torch can reveal wet trails and small openings; pinpricks of daylight may indicate gaps. Moisture mapping or thermal imaging can help distinguish damp areas from dry material. These observations guide the exterior inspection without treating every wet patch as proof of roof failure.
On the roof, the inspection compares those interior clues with the membrane, metal roof seams, fasteners, flashing and drains. Technicians look for separated joints, blocked drainage and water held around a penetration. A controlled flood test can confirm a suspected source after waterproofing work. The test should last 24-48 hours, with the ceiling below checked during testing.
Leak timing offers another diagnostic clue. Water appearing only during high winds can indicate rain driven beneath a roof covering. Persistent dampness near an AC condensate line or window perimeter may point away from the roof. For ambulance high roof leak prevention in desert rainstorms, technicians use these patterns to focus the assessment on likely entry paths instead of treating every stain alike.
Inspection findings determine the repair scope. A localized opening may need targeted roof leak repair, while widespread membrane failure or structural damage calls for a broader assessment. Do not assume one stain means the roof needs replacing: the condition and extent of damage determine whether a repair can address the source. A temporary patch can limit water entry, but it does not prove the leak path is fixed.
For ambulance high roof leak prevention in desert rainstorms, provide the vehicle operator’s account of where the leak appeared and the weather conditions at the time. Technicians can use that context alongside inspection findings to trace the source and plan suitable waterproofing. Explore vehicle fabrication services for work involving a specialized vehicle’s roof structure.
Auto Industries Factory
Auto Industries Factory LLC can help when leak prevention forms part of a broader ambulance conversion or roof-structure project. Its ambulance conversions, metal canopies and roof racks address vehicle configuration and fabricated roof components. Inspection findings can help define the issue and the work required.
For a leaking converted ambulance, provide the vehicle details, visible moisture location and notes about when it appears. This context helps connect source-tracing findings with the vehicle’s roof layout and equipment. If the project involves a roof conversion or fabricated component, discuss how the structure and its joints fit the intended use. For focused guidance on your vehicle project, contact Auto Industries Factory LLC.
Plan a roof assessment before the next storm
Make the next step a clear assessment of the vehicle’s roof and conversion requirements. For ambulance high roof leak prevention in desert rainstorms, connect observed water entry to the appropriate structural or waterproofing work before choosing a repair.
Auto Industries Factory LLC undertakes Ambulance Conversions, Police & Military Vehicle Modifications, and Safari Vehicle Conversions. If your vehicle’s roof configuration or conversion needs professional attention, share where water appears and under what conditions. This context helps define the project and relevant fabrication requirements.
Start planning while the vehicle can be assessed without an active leak. Contact Auto Industries Factory LLC for help with your vehicle project, and move forward with a clearer plan for dependable use.
Frequently Asked Questions
Need Help with a Leaking Roof?
Yes, a leak affecting an ambulance high roof deserves attention before moisture spreads. Record where water appears, when it occurs and whether the vehicle has had roof or equipment changes. Auto Industries Factory handles ambulance conversions, so you can discuss how the roof configuration relates to your project. If water is near electrical fittings or equipment, keep the affected area out of use until it has been assessed.
How do professionals identify roof leak entry points on a high-roof ambulance?
Professionals compare interior moisture locations with the roof structure and installed equipment. They can record each damp area against fixed landmarks, such as a cabinet edge or ceiling light, then compare those locations with roof seams and mounted components. Notes about vehicle orientation and the rain conditions when the leak appeared add useful context. This evidence helps narrow the inspection without assuming the opening is directly above the visible water.
What water test methods can professionals use to locate leaks in a high-roof ambulance?
A controlled flood test can help isolate a suspected leak when visual inspection alone doesn’t identify the source. A professional introduces water to a limited roof area while monitoring the interior, then relates any moisture to that test area. A flood test of a waterproofed roof should last 24-48 hours, with the ceiling below checked during testing. Controlled testing helps avoid wetting unrelated roof sections at the same time.
Which roof sealants do professionals choose to resist UV exposure, high temperatures, and sudden heavy rain?
Professionals choose a sealant based on the roof material, joint movement, surface preparation and exposure conditions. The product must be compatible with the existing membrane and suitable for heat, UV exposure and water contact. No sealant suits every seam or roof material. For example, a product chosen for one panel joint may not suit an equipment base, where the substrate and movement can differ.
What damage can roof leaks cause to ambulance wiring, medical equipment, and interior panels?
Water reaching wiring can damage electrical systems and create a hazard. Moisture can also affect powered equipment if it reaches connections or controls. Repeated wetting may stain, soften or loosen interior panels, while damp insulation can remain hidden behind them. The visible drip may understate the affected area. A prompt assessment should identify wet electrical components and map moisture beyond the panel mark.


