

Vehicle compatibility comes first: most aftermarket rear bumpers are made for specific vehicles, so fit depends on the exact year, make and model. Custom off-road rear bumper fabrication should also account for factory sensors and cameras, since their placement and operation vary by vehicle. A bumper that overlooks these details can cause fitment or function issues, even if the design looks right.
It’s easy to focus first on a winch mount, recovery points or a tougher look. But the bumper has to fit the vehicle and work with its existing equipment before those choices can deliver practical value. This guide explains how to assess compatibility and choose protection, recovery features, design, materials and fabrication options for your intended use.
You’ll see how vehicle measurements and factory equipment shape the design, what to weigh when comparing steel and aluminum, and how cutting, bending, fitting and finishing affect the result. The aim is to give you clear decisions for your project, whether you’re planning a focused upgrade or a tailored rear-end solution.
Key Takeaways
- Start with your vehicle’s exact year, make and model, then account for factory sensors and cameras before settling on a bumper design.
- Match protection and recovery features to how you use the vehicle, with mounting points and reinforcement integrated into the structure.
- Plan tube bends, cuts and mounting positions together to achieve a clean fit and preserve useful clearance.
- Compare steel and aluminum by weighing strength needs against the importance of keeping added weight down.
- Decide whether welding and finishing suit a DIY build or whether the project’s fabrication demands call for a dedicated shop process.
DIY bumper welding or shop welding and powder coating
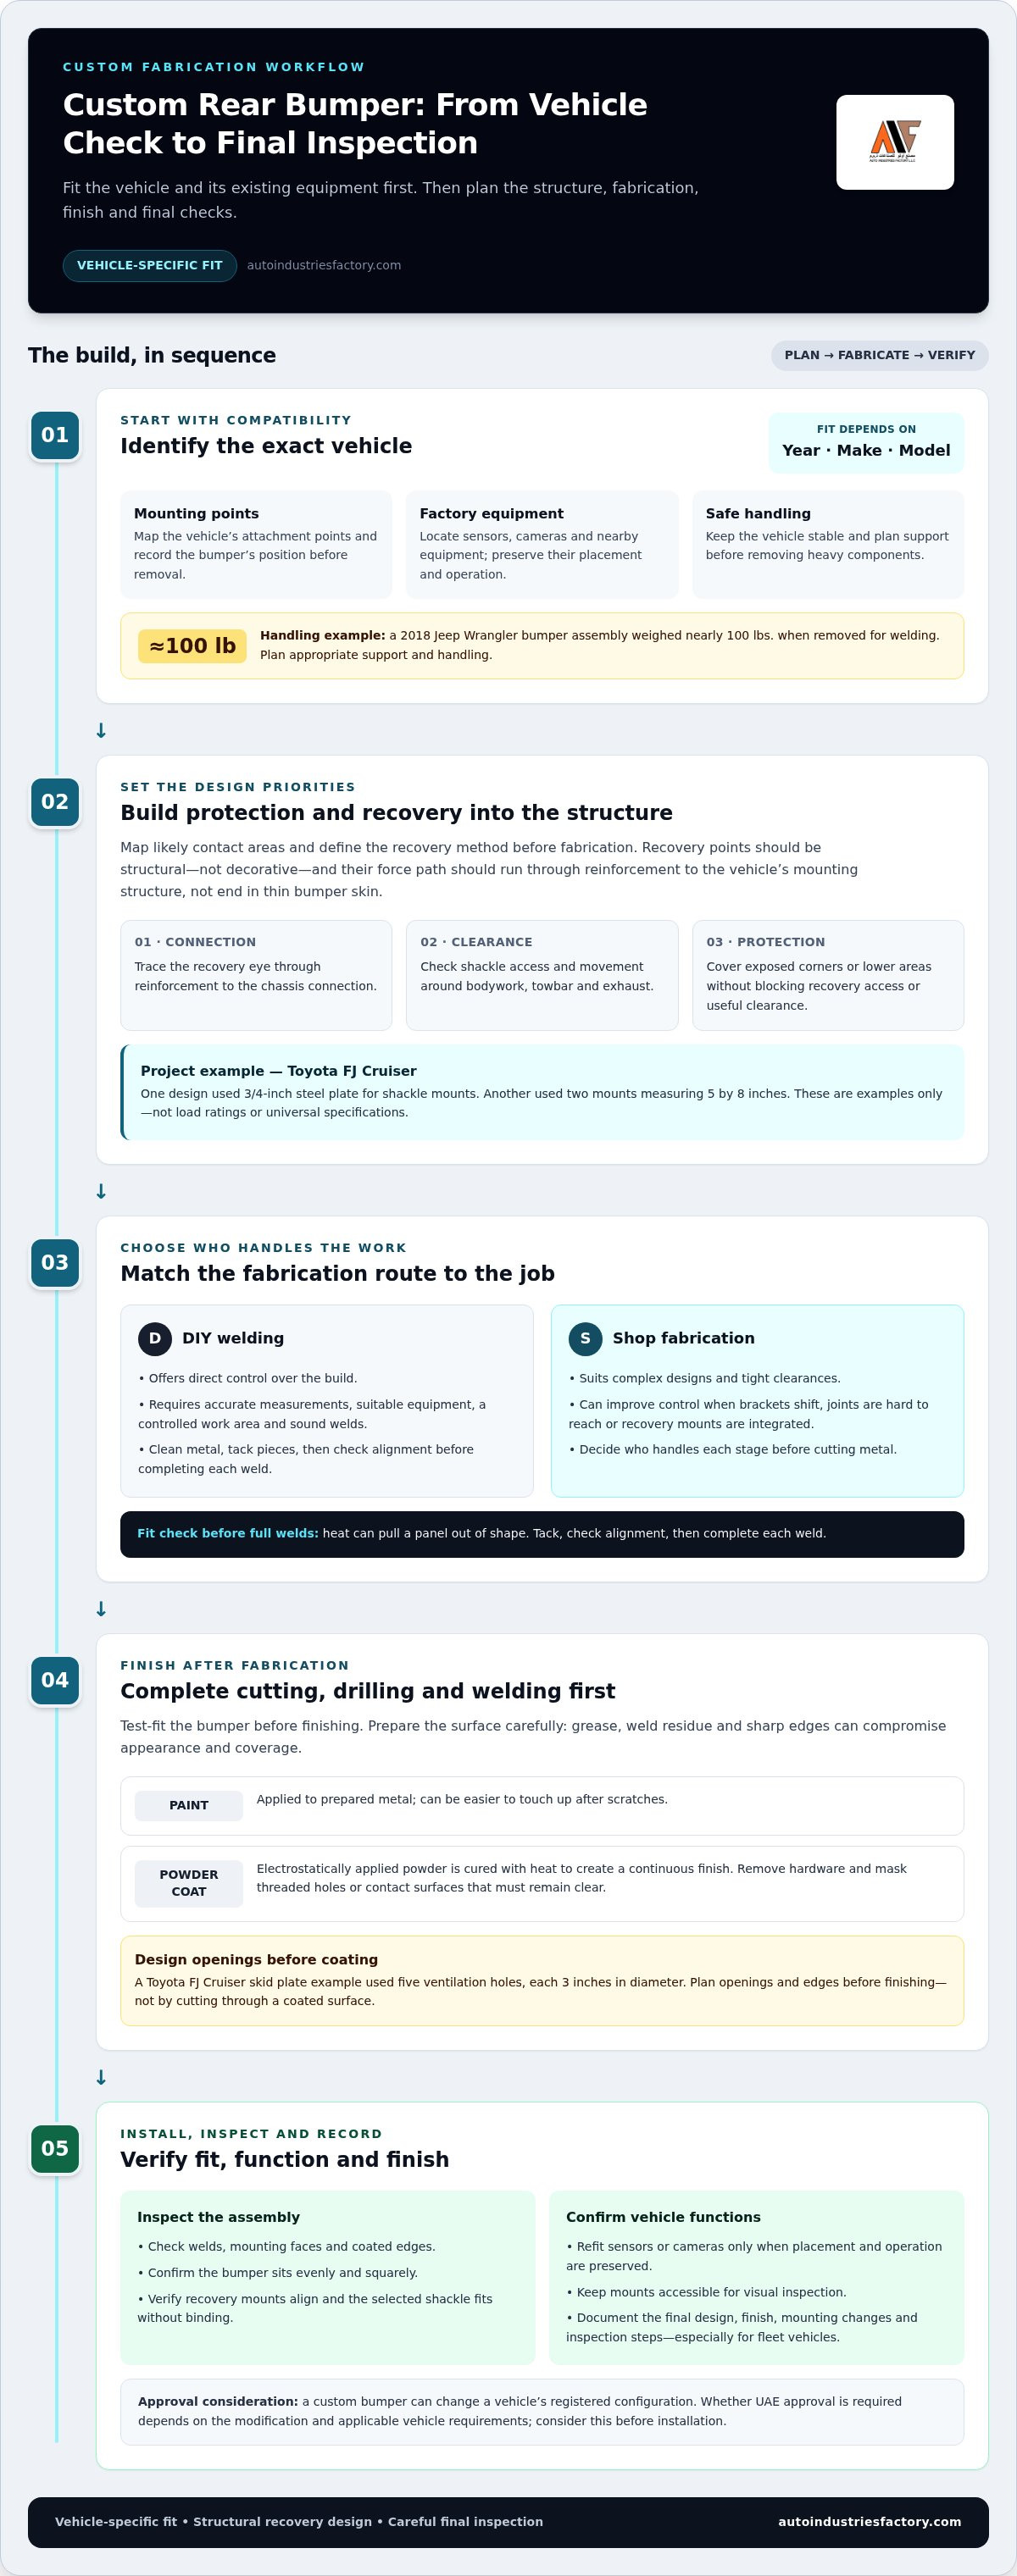
Choose between DIY welding and shop fabrication based on fit, structure and finish. A home build offers direct control, but requires accurate measurements and sound welds. Shop fabrication suits complex designs, tight clearances or integrated recovery mounts. For custom off-road rear bumper fabrication, decide who will handle each stage before cutting metal.
Start with the vehicle’s exact year, make and model, then map the mounting points and nearby equipment. A 2018 Jeep Wrangler bumper assembly weighed nearly 100 lbs. when removed for welding, so plan safe support and handling before attempting similar work. Record the bumper’s position, mark brackets, and keep the vehicle stable during removal. A front bumper may need different access and mounting checks.
DIY welding requires suitable equipment, a controlled work area and the skill to produce consistent joints. Clean the steel to remove coating, rust and contaminants, then tack the pieces in place. Check alignment before completing each weld, since heat can pull a panel out of shape. If a bracket shifts or a joint is hard to reach, shop welding can improve control over fit and reinforcement.
A custom bumper can change a vehicle’s registered configuration. Whether UAE approval is required depends on the modification and applicable vehicle requirements, so consider approval before installation. Fabrication and fitting time depends on design complexity, mounting adjustments, welding access and finishing. A simple build involves fewer operations than a bumper with integrated mounts and several fit checks.
Choose paint or powder coating after welding and test-fitting. Paint is applied to prepared metal and can be easier to touch up after scratches. Powder coating uses electrostatically applied powder that is cured with heat to create a continuous finish. Both depend on surface preparation: grease, weld residue or sharp edges can compromise appearance and coverage.
A powder-coat finish is usually applied after fabrication, so complete cutting, drilling and welding first. Remove the bumper’s hardware and mask threaded holes or contact surfaces that must stay clear. A Toyota FJ Cruiser skid plate example used five ventilation holes, each 3 inches in diameter. That illustrates why openings and edges should be designed before coating, not cut through a finished surface.
Before installation, inspect welds, mounting faces and coated edges, then confirm the bumper sits evenly against the vehicle. Refit sensors or cameras only if the design preserves their placement and operation. For a fleet vehicle, document the finish, mounting changes and inspection steps. This record helps keep future repairs and replacement parts consistent.
Rear bumper protection and recovery features
A rear bumper can protect vulnerable bodywork and incorporate recovery points, but both functions require deliberate structural design. Start by identifying likely contact areas, the vehicle’s recovery method and how the bumper attaches to the chassis. A recovery eye that looks substantial may still be poorly positioned if its load path ends in thin bumper skin.
Plan recovery points as part of the bumper structure, not as decorative additions. The mount, surrounding plate, welds and chassis attachment all contribute to how forces travel through the assembly. A Toyota FJ Cruiser design used 3/4-inch steel plate for its shackle mounts. This is a project example, not a universal specification for every vehicle or recovery setup.
Another Toyota FJ Cruiser design used two 3/4-inch steel shackle mounts, each measuring 5 by 8 inches. These dimensions describe that specific build. They don’t establish a load rating or guarantee suitability for another vehicle. The required design depends on the chassis, intended recovery method, material, weld layout and mounting arrangement.
Before fabrication, define how the recovery point will be used. A shackle eye, for example, needs clearance for the selected shackle and a direct, accessible connection. Position it so adjacent panels, the towbar or exhaust components don’t obstruct attachment. Include these checks in the drawing and confirm the placement during a vehicle fit check.
- Chassis connection: Trace the route from the recovery eye through its reinforcement to the vehicle’s mounting structure.
- Clearance: Check shackle movement and access around the towbar, bodywork and other rear equipment.
- Fabrication quality: Review the mount’s material, weld access and alignment with the bumper design.
For protection, map exposed corners and lower sections against the vehicle’s intended terrain. A wraparound cheek can shield a corner, while a lower plate can cover an exposed area. Keep recovery access open and avoid placing protection where it blocks required equipment or makes inspection difficult. Balance coverage with useful clearance.
In the UAE, choose a reputable fabricator by reviewing vehicle-specific drawings, comparable finished work, mounting details and the planned inspection process. Ask how the recovery eye connects to the chassis, then compare that explanation with the fabrication drawing. Clear answers matter more than a rugged appearance alone.
During final inspection, check that both mounts align, welds are accessible for visual examination and the bumper sits squarely. Confirm the selected shackle fits without binding. Record the final design and recovery-point locations, especially for fleet vehicles, so future inspections and replacement work can follow the same configuration.
Tube bending, cutting and fitting
A well-fitted bumper depends on coordinated tube geometry, plate profiles and vehicle mounting points. Design, cutting, bending and trial fitting should follow a clear sequence.
Tube Preparation and Fitting
Begin with the vehicle’s mounting points and the bumper’s intended outline. Measure the available space, then map each tube’s path around the rear bodywork. A Toyota FJ Cruiser bumper design used 32.5 inches of 1.25-inch outside-diameter steel tube for its reinforcing cross-member. This example shows how tube dimensions and length follow a specific design, not a universal template.
Mark the tube’s bend locations before cutting, and keep the ends square for clean joints. Bend gradually, checking the curve against the drawing and vehicle. Trial-fit the tube before welding: a small change in angle can shift the bumper’s edge or interfere with adjacent parts. Check fit at mounting points, corners and access openings, then adjust before final joining.
Keep matching components consistent on both sides. Left and right tube sections should meet the same reference points, while the cross-member should sit square to the mounts. This helps prevent alignment issues from carrying into plate installation or final fitment.
Cutting and Joining Methods
Laser cutting is useful for repeatable plate profiles, mounting holes and shaped openings. Base the drawing on the actual vehicle interface, then check each cut part against the assembly layout. Folding flat plate creates formed sections without building every edge from separate pieces. Plan bends around the plate’s final position so folded edges clear nearby components.
Hand welding joins tubes, brackets and folded plates after alignment. Tack the parts first, check the assembly on the vehicle, then complete the joints in a sequence that limits distortion. Grind only where the design requires a flush surface: removing sound material can weaken an edge or bracket. Inspect each joint before finishing.
For a fabrication review, look for clean cut edges, consistent folds and accessible welds. Confirm holes align with the intended fasteners and the assembled bumper remains square. These checks connect the laser-cut parts to the actual vehicle, rather than relying on a drawing alone.
Design and Fabrication Process
How is a custom off-road rear bumper designed and fabricated? Start with vehicle measurements, mounting locations and the required bumper outline. Lay out tubes and plates, prepare cut and bend patterns, then check the assembly against the vehicle before completing the welds and finish.
Use a staged fit check: position the mounting structure first, add the cross-member, then place the outer tubes and plates. This sequence reveals clearance problems while parts remain adjustable. For a fleet, keep drawings and final dimensions with each vehicle’s configuration. This supports repeatable fabrication if another matching bumper is needed.
Before approving the finished assembly, compare it with the drawing and test its fit on the vehicle. Check mounting alignment, tube symmetry, plate edges and access to adjacent equipment. A controlled process from measurement to trial fit helps catch geometry errors before finishing.
Design considerations and approach angle
A bumper’s outline affects body coverage, ground clearance and rear approach geometry. Design around the intended terrain, rear equipment and exact vehicle configuration.
For the 2007 Toyota FJ Cruiser, the stock approach angle was 34 degrees. A custom bumper design for that vehicle had an approach angle of 43 degrees. These figures illustrate one design example, not a target for every 4x4. The bumper’s lower edge, mounting position and surrounding vehicle geometry all influence clearance.
Evaluate the vehicle on the terrain it actually uses. A bumper that extends well beyond the body can contact an obstacle sooner, while a compact profile may preserve more clearance. Compare the bumper’s lowest points with the underbody and rear equipment. Review the design from the side and rear, then check likely contact areas before approving its shape.
A poorly designed or installed rear bumper can have loose mounts, obstruct equipment or leave body areas exposed. Incorrect fit can also interfere with sensors or cameras, so check their placement and operation after installation.
Weight, clearance, towing and sensors each respond to different design choices. Added bumper weight affects the vehicle’s overall load, while a low or extended profile can reduce clearance. Towing depends on preserving the intended towbar position and access. Sensor and camera function depends on their location and clear operating space.
Use a vehicle-specific drawing to resolve these trade-offs. Mark the towbar, sensor locations, exhaust and body edges before shaping the bumper. Compare the proposed outline against those points. A fleet specification should also record the selected configuration, helping ensure matching vehicles receive consistent designs.
- Clearance: Review the bumper’s lowest edge and rear projection against the vehicle’s intended terrain.
- Towing: Preserve towbar access and make sure the bumper design does not block its use.
- Sensors: Keep factory sensors and cameras in their intended positions, with clear space around them.
- Weight: Consider the bumper alongside other vehicle equipment when assessing the total load.
Before fabrication, compare the drawing with the vehicle and identify each possible interference point. A test fit can reveal contact with the towbar, bodywork or nearby equipment before the finish is applied. For a Toyota FJ Cruiser, the 34-degree stock and 43-degree design figures show how geometry can change between configurations. Treat the final shape as a vehicle-specific decision, not a universal measurement.
Close the design review by confirming mounting alignment, clearance, towing access and sensor positions on the vehicle. These checks make the bumper’s trade-offs clear before installation is complete.
Metal and heavy-duty bumper options
Material choice and plate thickness affect a bumper’s weight, strength and construction. A Toyota FJ Cruiser design illustrates how different sections can use distinct materials and dimensions instead of a single, uniform plate specification.
That example used 3/8-inch steel plate for its plate uprights and frame horn mount plates. It also used approximately 15 feet of 1.75-inch outside-diameter steel tube with a 0.120-inch wall, plus approximately 15 feet of 1.5-inch outside-diameter steel tube with a 0.120-inch wall. These are project-specific dimensions, not universal requirements.
Other sections used thinner plate for different roles. The winch mount plate and stiffeners used 1/4-inch steel plate. The deck plate, bash plate and winch-plate gussets used 1/8-inch steel plate. Cheek plates and bash-plate mounting tabs used 3/16-inch steel plate. In a design review, identify each part’s function before selecting thickness.
Steel bumpers offer strength, while aluminum bumpers can reduce weight. Compare these priorities with the vehicle’s intended use and the weight of the full assembly. Don’t assume every plate needs the same material or thickness: the mount, outer shell and protective sections have different roles.
A winch-equipped design also needs a compatible mounting pattern. The standard four-hole winch mount pattern described for the bumper is 4.5 by 10 inches. Use that measurement when laying out the mounting plate, then align its holes with the selected winch and the bumper’s reinforcement. A mismatch can prevent proper installation even when the plate appears substantial.
Production methods depend on the part and build approach. A bumper-production example uses stamping, hydraulic pressing, spot welding and gas welding. These processes illustrate ways to form and join metal; a custom build may instead combine cut plate, folded sections, tube and hand-welded joints.
For a heavy-duty specification, review the material schedule alongside the fabrication drawing. Match each component to its role, check the winch pattern and account for how the structure joins the vehicle. This makes weight and strength decisions clear before fabrication begins.
Need a bumper built around a specific vehicle and equipment layout? Explore custom bumper fabrication options and define the required material and mounting features for your project.
Auto Industries Factory: Ambulance Conversions
Auto Industries Factory LLC handles specialized vehicle projects, including Ambulance Conversions, Police & Military Vehicle Modifications and Safari Vehicle Conversions. Turn to the company when a fleet requirement extends beyond a single bumper and calls for a purpose-built vehicle configuration. Metal Canopies and Roof Racks can also support vehicles that need practical equipment-carrying solutions.
For a bumper-focused project, define the vehicle, intended use, mounting requirements and related modifications before setting the fabrication scope. For broader fleet needs, these details help connect the bumper decision to a specialized conversion plan. Discuss the vehicle’s role and required configuration with the fabrication team as the next step.
Contact Auto Industries Factory LLC to discuss your vehicle project and its requirements.
Put Your Bumper Plan Into Motion
Turn your priorities into a clear fabrication brief. Define the vehicle, its working conditions, essential equipment and the compromises you’re willing to make. This gives custom off-road rear bumper fabrication a practical direction, whether your priority is protection, recovery use or a broader vehicle build.
Auto Industries Factory LLC also handles Ambulance Conversions, Police & Military Vehicle Modifications and Safari Vehicle Conversions. These services reflect its focus on specialized vehicle fabrication and modification. For a bumper project, share your vehicle details and intended use so the required configuration can guide the next steps.
Contact Auto Industries Factory LLC to discuss your vehicle project. A focused brief is a strong starting point for building a solution around the way your vehicle works.
Frequently Asked Questions
How do I know if a product is compatible with my vehicle?
Match the bumper to your vehicle’s exact year, make and model, then compare its mounting layout and equipment clearances. Trim level and factory options can affect sensor, camera and towbar placement. For example, a bumper designed for one Toyota Land Cruiser configuration may not align with another. Check the stated vehicle fitment and note installed accessories before selecting a design.
Why Upgrade to an Aftermarket Bumper?
An aftermarket bumper can offer a different combination of body protection, recovery access and accessory mounting than the original. The right upgrade depends on driving conditions: a vehicle used on rough tracks may need different coverage from one used mainly on paved roads. Consider added weight, towing access and factory equipment too. A bumper that doesn’t suit the vehicle’s use can add features without solving the right problem.
What features can be included in a custom off-road rear bumper?
Depending on the design, a custom rear bumper can incorporate recovery-point mounts, a winch mount, protective plates, lighting mounts, a towbar opening or access for factory sensors. Choose features for actual use instead of adding every available option. A fleet vehicle, for example, may benefit more from accessible towing equipment and replaceable sections, while an expedition vehicle may prioritize recovery access and protection for exposed bodywork.
What materials and steel thickness are best for an off-road rear bumper?
There isn’t one best material or thickness for every vehicle; the design and component’s role matter. Steel favors strength, while aluminum can reduce weight. A Toyota FJ Cruiser bumper example used 3/8-inch steel for plate uprights, 1/4-inch steel for the winch mount plate and stiffeners, and 1/8-inch steel for its deck plate and bash plate. Those are project details, not universal specifications.
How much does custom off-road rear bumper fabrication cost in the UAE?
The cost of custom off-road rear bumper fabrication in the UAE depends on the vehicle, material, design complexity, fabrication steps, finish, mounting requirements and selected features. The price is provided after a quote request. A bumper with integrated recovery mounts or a winch plate involves different materials and work from a simpler design, so define the intended configuration and vehicle details when requesting a project quote.
How does a custom bumper compare with an aftermarket bolt-on bumper?
A bolt-on bumper is typically designed for a defined vehicle fitment and set of features, while a custom build can suit a specific configuration or equipment layout. Custom fabrication may work well for a vehicle with unusual accessories or a specialized purpose, but its measurements and features need to be developed for that vehicle. Compare fitment, equipment access, material and intended use before choosing.
What vehicle measurements and information are needed for a custom bumper quote?
Prepare the vehicle’s year, make, model, trim and relevant factory options. Include clear photos of the rear, mounting points, towbar, sensors, exhaust and existing accessories. Note the intended use and required features, such as recovery mounts or a winch plate. If you have a preferred outline, provide a sketch with reference measurements. These details help define fitment and fabrication scope.


