

For a patrol unit, security patrol vehicle upfitting transforms a base vehicle into a work-ready platform by integrating mission equipment and organizing the interior around its duties. It takes more than adding lights or a console: equipment placement, secure mounting, and the officer’s workflow all need to work together.
That distinction matters. A patrol SUV, traffic vehicle, and prisoner-transport vehicle have different duties, so one layout may not suit them all. Poorly planned equipment can crowd the cabin or make essential controls harder to reach.
This guide explains what vehicle upfitting includes and how fleet equipment, installer specifications, and officer-focused layouts shape a patrol vehicle in the UAE. You’ll learn how to define the vehicle’s mission, plan consoles and mounting systems, and approach warning equipment and installation requirements. The goal is a clear, practical framework for understanding how each upfitting decision supports the people who use the vehicle and the work it must perform.
Key Takeaways
- Map each vehicle’s duty before selecting equipment; patrol, traffic, transport, and support roles call for different configurations.
- Plan console and mounting positions around access, visibility, and secure equipment placement to keep the cabin practical for daily use.
- Give installers clear equipment specifications and performance expectations before work begins to align the build with fleet needs.
- Shape controls and storage around officer tasks instead of applying one layout to every vehicle.
- Choose warning-system functions and placement as part of the complete vehicle setup, not as isolated add-ons.
Equipment consoles and mounting systems
Console placement determines whether an officer can reach equipment while keeping their attention on the road. During security patrol vehicle upfitting, map each control to a task before choosing a console. A radio used for routine dispatch, for example, should be reachable from the seated driving position. Place a camera display within the driver’s normal field of view without blocking the windscreen or obscuring factory controls.
Begin with the cabin and equipment list. Record each device’s dimensions, mounting method, cable route, and access needs. Then group controls by function: driving, communications, observation, and vehicle systems. A center console can organize a radio, microphone, and controller, while a separate mount positions a camera screen. Keep frequently used controls closer than equipment used only when parked.
For UAE operations, select lighting, sirens, markings, and other equipment according to the vehicle’s authorized use and applicable approval requirements. A security patrol role alone does not authorize police-style signals or markings.
Organized storage keeps loose equipment under control and essential items easy to find. Assign each item a fixed place, such as a lockable compartment for sensitive devices or a secured holder for a torch. Match compartment size to the item. A radio stored among unrelated tools, for example, may be harder to retrieve. Labels can help staff return equipment to the same place after shift changes.
Secure mounts are important on uneven roads and during sudden braking. Choose brackets suited to each device, and route wiring so it cannot snag, interfere with pedals, or restrict seat movement. Standardizing console positions across the same vehicle type can make controls familiar between units. Avoid imposing one layout on vehicles with different cabin shapes or duties.
- Communications: Include a vehicle radio, reachable microphone, and a clear way to receive dispatch instructions. Position the handset so the driver can operate it without stretching across the cabin.
- Dispatch information: A secured display or approved mobile device can show assignments and location details. Mount it where it remains readable without blocking the driver’s view.
- Observation: Position a camera display and controls for quick access, then secure their cables and mounts.
Before installation, check reach and sightlines from the driver’s seat. Confirm the console leaves seat belts, door controls, and vehicle controls accessible. A final walkthrough with officers can catch an awkward reach or blocked storage lid before the layout is repeated across the fleet.
Installer qualifications and specifications
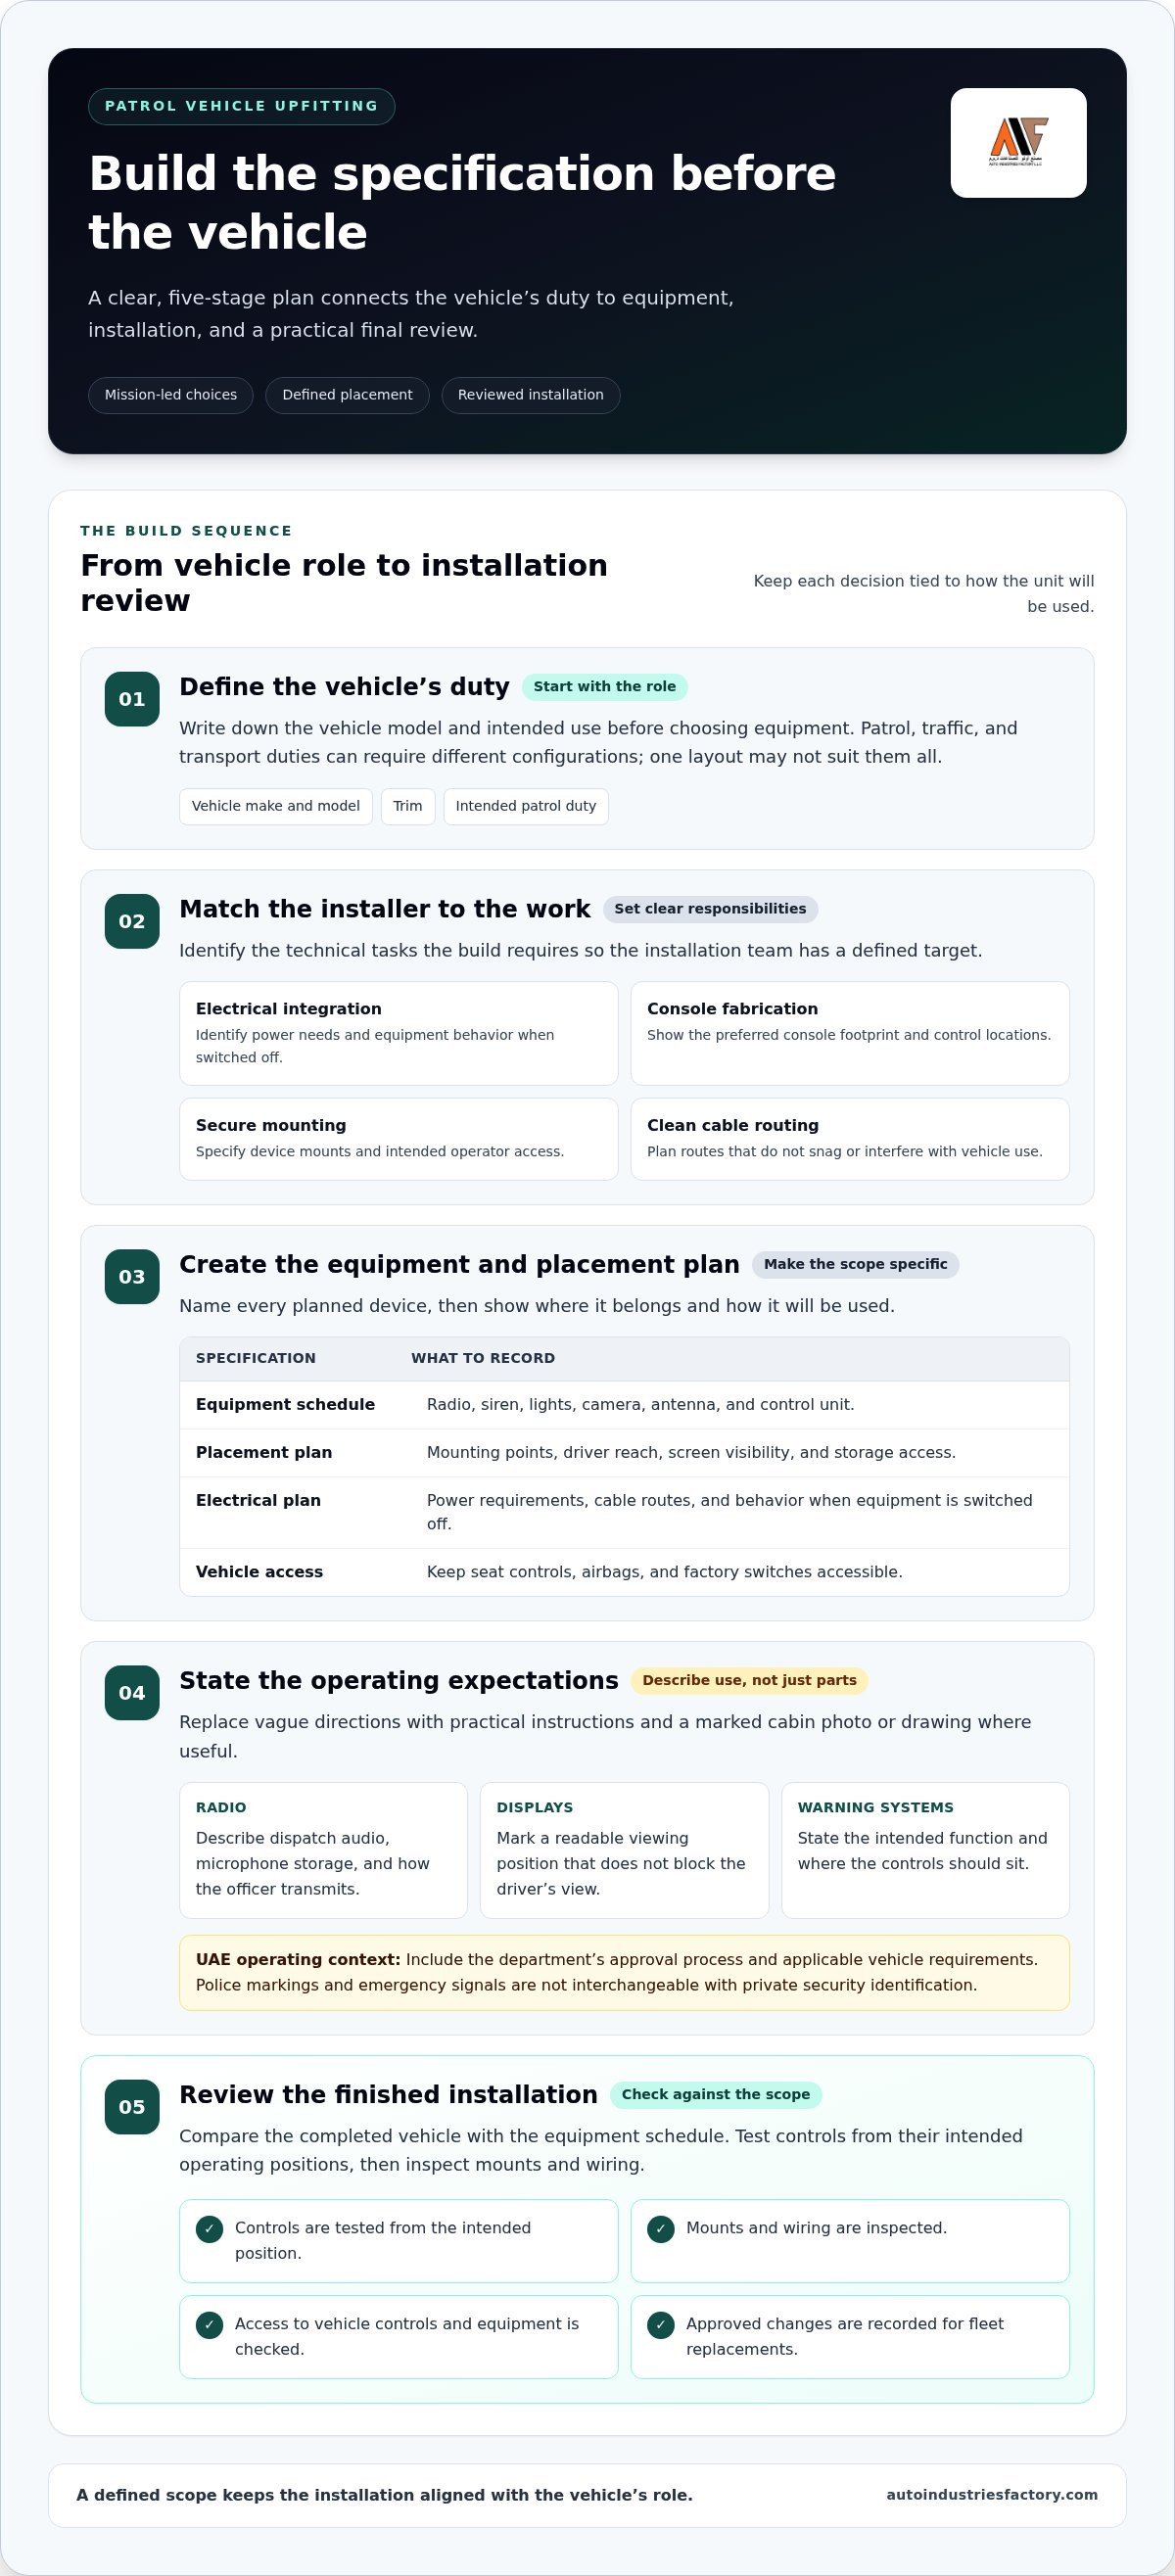
Start a patrol build with a written scope, not a parts order. List the vehicle model, its duties, and every device planned for installation. A police response SUV, for example, may need radio equipment, sirens, warning lights, and a camera display. A transport unit may require a different cabin layout. A clear scope keeps equipment choices aligned with the vehicle’s actual role.
Match the installer’s capabilities to the work. Electrical integration, console fabrication, secure mounting, and clean cable routing each involve distinct technical tasks. Specify which components need power, where controls should sit, and how officers will use them. Identify vehicle systems that must remain accessible, including seat controls, airbags, and factory switches. These details give the installation team a defined target.
Describe performance expectations in practical terms. Specify which devices the driver must reach while seated, where the radio microphone will rest, and how the camera display should be viewed. For sirens and emergency lighting, state their intended function and control location. Replace vague directions such as “install neatly” with a drawing or marked cabin photo showing the preferred console footprint and cable routes.
- Vehicle details: Record the make, model, trim, and intended patrol duty.
- Equipment schedule: Name each radio, siren, light, camera, antenna, and control unit.
- Placement plan: Mark mounting points, operator reach, screen visibility, and storage access.
- Electrical plan: Identify power needs, cable routes, and the required behavior when equipment is switched off.
Before installation, align the fleet specification with the UAE operating environment. Distinguish authorized vehicle use from equipment appearance: police markings and emergency signals are not interchangeable with private security identification. Include the department’s approval process and applicable vehicle requirements in the project scope rather than assuming one police configuration suits every patrol vehicle.
Give radio installers clear specifications and performance expectations before work begins. Describe how dispatch audio should be heard, where the microphone should be stored, and how the officer can transmit without obstructing driving controls. State whether the radio is used mainly from the driver’s seat or while the vehicle is stationary. Each use case changes placement and access priorities.
Close the specification with an installation review. Compare the completed vehicle with the equipment schedule, test each control from its intended operating position, and inspect mounts and wiring. Record approved changes so fleet replacements follow the same standard. For police and military vehicle modifications, a defined scope connects fabrication and vehicle integration to the unit’s intended role.
Law enforcement and patrol vehicle upfitting
Equip each patrol unit for its assigned work rather than treating it as a generic police vehicle. Match every modification to an operational need, then review visibility, access, vehicle condition, and fleet support.
Safety and Visibility Modifications
Safety and visibility modifications may include warning lights, sirens, reflective markings, cameras, and secure equipment mounts. Review sightlines from the driver’s seat, visibility around the vehicle, and access to controls before approving placements. In the UAE, let the vehicle’s intended use and applicable approvals guide choices for lights, sirens, markings, and equipment. Do not assume a private security patrol vehicle can use police signals or markings.
Visibility also depends on how components work together. A camera display should not block the road view, and added equipment should not obstruct mirrors or vehicle controls. Consider the patrol setting: a marked unit operating near traffic has different visibility needs from an administrative vehicle. Record the chosen configuration for each police or enforcement fleet role.
Planning and Completing an Upfit
Plan the upfit in sequence: identify the vehicle’s duties, list required equipment, map placements, document electrical and mounting needs, then inspect the completed installation. A traffic unit, for example, may need a different layout from a supervisor vehicle. A clear specification gives installers practical performance expectations and provides the department with a consistent basis for reviewing each build.
Before release, test every control from the officer’s operating position. Check warning systems, radio access, camera visibility, mount security, and cable routing. Record approved changes so replacement police vehicles can follow the same fleet standard. The practical process is straightforward: define the mission, specify the build, install, test, and document.
Upfitting can affect warranty, insurance, fuel economy, and resale value through added electrical loads, weight, altered bodywork, or changes to original components. Keep installation records, equipment details, and vehicle condition notes together. They help explain the build during warranty discussions, insurance reviews, or a later sale. Assess added weight and electrical demand alongside the vehicle’s intended duties, as both can affect operating requirements.
Include mounts, wiring, controls, and added equipment in fleet maintenance inspections. A loose console, damaged cable, or failing light can affect safe operation, so schedule checks during routine vehicle servicing and after equipment changes. Track faults by vehicle and component to spot recurring fleet issues without treating each modification as a separate, undocumented build.
One configuration won’t serve every law enforcement role. General patrol, traffic enforcement, K-9 support, prisoner transport, and administrative fleets have different equipment demands. Standardize builds within each role instead of creating unnecessary one-off layouts. A shared specification helps agencies train officers on familiar controls and makes replacement parts and maintenance procedures easier to organize.
Too many one-off vehicle builds can make a fleet harder to maintain, train on and support. On many vehicles, basic wiring and an inexpensive switch can enable secure idle, allowing the engine to keep running after the key is removed. The page estimates that converting one traditional police vehicle to an EV would reduce carbon dioxide pollution by more than 55,000 pounds per year.
Officer-focused patrol vehicle layouts
A patrol layout should follow the officer’s tasks, not a generic equipment template. During a shift, an officer may drive, receive dispatch instructions, monitor a camera, and access stored gear. Arrange each control around that sequence. A layout that suits a general patrol SUV may frustrate traffic, K-9, prisoner transport, or administrative teams.
Begin by mapping the work from the driver’s seat. Identify the controls used while moving, the equipment needed when parked, and the items that require secure storage. Keep driving-related controls within natural reach, and place less-used equipment away from the primary operating area. A frequently used radio microphone, for example, should not sit behind a storage-compartment lid.
Visibility is part of the layout, not just a lighting decision. Position a camera display so the officer can view it without blocking the forward road view. Keep mirrors, seat-belt access, and factory vehicle controls clear. In a patrol vehicle used near public spaces, clear sightlines help the officer monitor the surroundings while staying focused on driving.
- General patrol: Place frequently used communications and vehicle controls within easy reach.
- Traffic enforcement: Prioritize accessible warning-system controls and a clear view from the cabin.
- K-9 support: Plan cabin and storage arrangements around the assigned animal and its equipment.
- Prisoner transport: Keep officer controls distinct from the transport area and its equipment.
- Administrative use: Avoid adding mission equipment that the vehicle’s routine duties don’t require.
Do not force different roles into one cabin arrangement. The same configuration for every mission can create frustration. Instead, define a standard layout for each fleet role. Officers then encounter familiar control positions in vehicles assigned to similar duties, while each layout retains the differences its mission requires.
Test the proposed arrangement with officers who perform the work. Ask a driver to sit normally, reach each control, operate the radio, and check the camera display. Then assess whether a passenger can access shared equipment without crowding the driver. This walkthrough can reveal blocked handles, awkward reaches, or storage that opens into another control.
Document the approved layout for each vehicle type, including a cabin diagram, equipment positions, and storage assignments. Fleet teams can refer to it for replacement builds, equipment changes, and officer familiarization. In the UAE, account for the vehicle’s operating environment and assigned role when planning visibility and access. A disciplined layout supports public safety by keeping essential equipment accessible without compromising the officer’s driving workspace.
How do you choose and install patrol lights, sirens, and warning systems?
Choose warning equipment according to the vehicle’s role, operating environment, and authorized use. For a patrol SUV, plan light placement, siren controls, and power connections together. In the UAE, account for applicable requirements and approvals before selecting signals or markings. Planning components together helps prevent conflicting controls and obstructed sightlines.
Start with the warning function. Identify which lights officers need, when they need them, and where the controls belong. Many modern warning lights include a low-power mode that reduces output after dark. This can help motorists pass a stopped emergency vehicle safely. Consider this function when specifying equipment for roadside work.
Next, select a siren and speaker arrangement that fits the vehicle. Most modern sirens can produce 200 watts of output when connected to a second speaker. Position the speaker for effective sound projection without obstructing vehicle components. Horn-ring control lets officers operate the siren through the steering-wheel horn, avoiding a reach toward the siren controller.
Review control behavior before installation. Park kill has been available on most sirens since the 1990s. It can stop siren output when the vehicle is shifted into park, depending on the system configuration. Smart controllers can also adjust warning-light configurations based on vehicle operating conditions, helping automate lighting decisions.
Mounting quality affects performance inside the cabin. For an internal lightbar, inspect the rubber gasket and bracket adjustment. A missing gasket can increase nighttime flashback, while poorly adjusted brackets can let the lightbar rattle against the windshield. Route wiring away from moving controls and secure connections to reduce snagging or interference.
Use an installation sequence that makes each decision visible:
- Specify: Record the intended warning functions, control locations, and speaker arrangement.
- Position: Check light visibility from outside and preserve the driver’s sightlines.
- Install: Secure brackets, fit the gasket, and route wiring clear of vehicle controls.
- Test: Operate each setting from the driver’s seat and inspect the system while parked.
Finish with a function check. Test each light mode, siren control, and controller response, then check that the lightbar does not move. Document the approved setup so fleet vehicles assigned similar duties can follow the same specification. For broader police and military vehicle modifications, coordinate warning-system planning with the vehicle’s overall conversion requirements.
In the UAE, consider applicable requirements and approvals before selecting warning signals or vehicle markings.
Keep the low-power option in view during specification. Many modern warning lights have a low-power mode that can reduce output after dark and help motorists pass a stopped emergency vehicle safely. Confirm that the selected arrangement suits the vehicle’s intended warning functions before installation.
Auxiliary white lights, such as takedown and alley lights, can often be programmed to flash while the vehicle is moving where state law allows. Treat this as a configuration choice, not an automatic setting. Check the intended operating conditions and ensure officers understand the controls during the parked function check. Coordinating these options with the lighting and siren plan helps keep the setup consistent with the vehicle’s assigned role.
Auto Industries Factory: Ambulance Conversions
Auto Industries Factory LLC provides Ambulance Conversions and Police & Military Vehicle Modifications for organizations planning specialized fleet vehicles. For a patrol or law enforcement unit, its vehicle modification work can follow a clear plan for the vehicle’s role, equipment, and layout. Ambulance Conversions serve a distinct emergency transport purpose and should be scoped around that operational need.
The key is matching the conversion to the vehicle’s intended function. A patrol build and an ambulance conversion serve distinct duties, so each needs its own project scope and equipment plan. Auto Industries Factory LLC also provides Safari Vehicle Conversions and Metal Canopies and Roof Racks for other specialized vehicle requirements.
Contact Auto Industries Factory LLC to discuss a suitable vehicle conversion for your fleet project.
Put Your Fleet Plan Into Motion
The next step in security patrol vehicle upfitting is to turn operational priorities into a clear project scope. Identify the vehicle’s role, the modifications it needs, and the requirements that matter to your team. A focused brief gives the build practical direction and keeps decisions tied to the vehicle’s intended work.
Auto Industries Factory LLC offers Police & Military Vehicle Modifications for specialized fleet requirements, alongside Ambulance Conversions and Safari Vehicle Conversions for distinct vehicle applications. Choose the offering that matches your project, then share the vehicle and its intended role to begin a focused discussion.
A well-planned conversion starts with a clear purpose. If your fleet is ready for its next step, contact Auto Industries Factory LLC to discuss your vehicle project. Move forward with a defined plan and a vehicle built around the work it needs to do.
Frequently Asked Questions
What Is Vehicle Upfitting?
Vehicle upfitting means modifying a standard vehicle to support a specific working role. For a patrol unit, this can involve integrating communications, visibility equipment, storage, and cabin controls. The build depends on the vehicle and its duties. A written equipment schedule can distinguish patrol vehicles from transport or administrative units and keep future replacements aligned with their intended tasks.
What equipment is included in a security patrol vehicle upfit?
A security patrol vehicle upfit may include a radio, dispatch device, camera, console, secure storage, and authorized warning equipment. Choose equipment to match the patrol assignment rather than assuming every unit needs the same package. A vehicle covering a large site, for example, may prioritize communications and observation equipment, while organizations looking to complement manned patrols with advanced perimeter automation can consult Defend Autonomous Robotics Trading LLC for modern autonomous systems and robotics. Plan around authorized use and fleet procedures.


